|
Progression focus – Detailed Step-by-step beginners guide
by Beathem
Filed as: Beginner, Guide
|
|
Week One Guide Beginners – Summoners War
by Beathem
Filed as: Beginner, Guide
|
|
Guide New Player Beginners – Summoners War
by Beathem
Filed as: Giant's Keep, Guide, No category
|
 |
Guide Speed-Tuning your Arena Team – Summoners War
by Beathem
Filed as: Guide
|
 |
[Guide] Hall of Heroes
by Beathem
Filed as: Guide, Hall of Heroes
|
 |
[Guide] Will VS Nemesis VS Revenge
by Beathem
Filed as: Guide, Runes
|
 |
Summoners War GB10 Guide [Updated]
by Beathem
Filed as: Giant's Keep, Guide
|
 |
Leader Skills for Raids
by Beathem
Filed as: Guide, Rift of Worlds
|
 |
Syntac’s In-Depth Raid Guide
by Beathem
Filed as: Guide, Rift of Worlds
|
 |
Rift of World Tips and Common Knowledge
by Beathem
Filed as: Guide, Rift of Worlds
|
 |
The ultimate, simplified guide for lifelong success with the World Boss
by Beathem
Filed as: Guide, World Boss
|
 |
AD META – The Triangle [Guide]
by Beathem
Filed as: Guide
|
![[Guide] Tips to Evolving a 6 Stars Monster - Thumbnail](http://beathem.org/wp-content/uploads/2015/11/Guide-Tips-to-Evolving-a-6-Stars-Monster-Thumbnail-120x120.png) |
Tips to Evolving a 6 Star Monster (for Beginner to Mid-Game Players)
by Beathem
Filed as: Guide
|
 |
K’s Guide to Choosing Attacker Runes v1.1
by Beathem
Filed as: Guide
|
 |
Multiple Attack Monsters – Necropolis Guide
by Beathem
Filed as: Guide
|
 |
Why Chasun is overpowered and requires rebalancing
by Beathem
Filed as: Guide
|
 |
Guide Top 8 Monsters Combos and Duo synergies
by Beathem
Filed as: Guide
|
 |
Guide: How to get a Nat 5 stars for F2P
by Beathem
Filed as: Guide
|
 |
How to Farm Power Up Stones Guide – Summoners War
by Beathem
Filed as: Guide
|
 |
Guide Top 10 First Monsters you should be focusing on – Summoners War
by Beathem
Filed as: Guide
|
 |
Runes Power-Up Success Rate and Mana to +15
by Beathem
Filed as: Guide
|
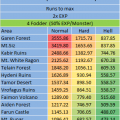 |
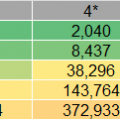
Runs required in order to Max a star level
by Beathem
Filed as: Guide
|
 |
Guide to Rune – Rules of Thumb – Summoners War
by Beathem
Filed as: Guide
|
 |
Summoners War Guide Social Points Test
by Beathem
Filed as: Guide, Testing and Probability
|
 |
Summoners War Guide Daily Missions Worth Money
by Beathem
Filed as: Guide
|
 |
Clear ToA 91-100 with a farmable team
by Beathem
Filed as: Guide
|
 |
Test – 1000 Unknown Scrolls Outcome and Analysis
by Beathem
Filed as: Guide, Testing and Probability
|
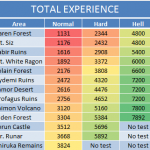 |
Summoners War Experience Guide Areas [Updated]
by Beathem
Filed as: Guide
|
